

To turn symmetry on, go to actions>canvas. Click the drawing guide toggle on. Click ‘Edit Drawing Guide’.

Click the ‘Symmetry’ section.
By default, the symmetry guide is one vertical line. In the middle is a blue node, which moves the line up or down or to the side. The green node rotates the line.You’ll see that, down at the bottom of your screen, you can change the opacity and thickness of the guide’s lines.
Also down by opacity and thickness is ‘Options’. Click this to see the symmetry guide options. You can choose to have the guide be vertical, horizontal, quadrant or radial.

The quadrant guide option means there’s a horizontal line and a vertical line splitting the canvas into four quadrants.
The radial guide option is split into eight, triangular sections.
Also on ‘Options’ is ‘Assisted Drawing’ and ‘Rotational symmetry’.
Assisted drawing turns on assisted drawing for that layer. Assisted drawing allows you to draw on any of the symmetry guide sections and have it be copied on to every section. Rotational symmetry has to do with how it is copied on to each section.
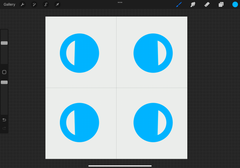
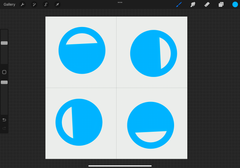
What difference does rotational symmetry make? When it’s off, the symmetry is made by reflecting and flipping the section into every other section. This is mirror symmetry. Rotational symmetry, on the other hand, is reflected and rotated.
Without Rotational Symmetry With Rotational Symmetry
Thank you for reading! I hope this was helpful and you’ll read more of our blogs about Procreate and join our email list.